Nginx实战 之 灰度发布

灰度发布(又名金丝雀发布,英文一般称为GrayRelease或Dark launch)是为了能够让用户逐步过渡到新功能一种发布方式。 一般是产品上线一个功能,希望在线上可以进行A/B testing,即让一部分用户继续用产品特性A,一部分用户开始用产品特性B,如果用户对B没有什么反对意见,那么逐步扩大范围,把所有用户都迁移到B上面来。

优点

  • 灰度发布可以保证整体系统的稳定,在初始灰度的时候就可以发现、调整问题,以保证其影响度。
  • 灰度发布可以让部分用户尽快体验到最新的功能,提高用户的积极性,进而收集用户反馈改善产品。

灰度发布在谷歌和Facebook等很多公司已经使用的相当成熟,具体的分流规则也有很多,下面简单介绍下几种常见的分流规则,并分别使用nginx来配置实现。


基于COOKIE分流

使用Cookie分流的原理为:在用户首次登录时查询该用户是否是灰度用户,并为其设置标识Cookie,后续采用Cookie标识来进行分流。
本文采用dark字段作为标识,如果cookie中dark的值true则分流到灰度环境,其他情况则分流到生产环境。
在nginx的原生变量中,$http_cookie的值为所有Cookie以key=value的形式拼接,而$cookie_dark则只获得Cookie中dark的值。所以可以采用两种方式来判断:

  1. 使用$http_cookie,则里面需要包含dark=true
  2. 使用$cookie_dark,则其值需要为true

最终nginx.conf文件中的核心配置如下:

1
2
3
4
5
6
7
8
9
10
11
12
13
14
15
16
17
18
19
20
upstream normal {
server 127.0.0.1:8080;
}
upstream dark {
server 127.0.0.1:8081;
}
server {
listen 80;
server_name localhost;
set $group normal;
#或者使用 if ($cookie_dark ~* "^true&") 来判断
if ($http_cookie ~* "dark=true"){
set $group dark;
}
location / {
proxy_pass http://$group;
}
}

注意 nginx使用的正则规则如下:

~  表示区分大小写的正则匹配
~* 表示不区分大小写的正则匹配
^  表示以xxx结尾
$  表示以xxx结尾

分流效果演示:启动了两台Tomcat,其中8080端口作为生产环境,8081作为灰度环境,为了加以区分,我在灰度环境的index.jsp页面上加上了This is dark launch page!。使用Postman来模拟请求,大家都知道POSTMAN能够添加Header,但是却不能修改Cookie,这时候需要Postman Interceptor来救场了。可以看到下载并启用Postman Interceptor插件以后,在Header中直接编辑Cookie属性,即可修改请求的Cookie。最终效果如下图:
使用postman-interceptor修改cookie
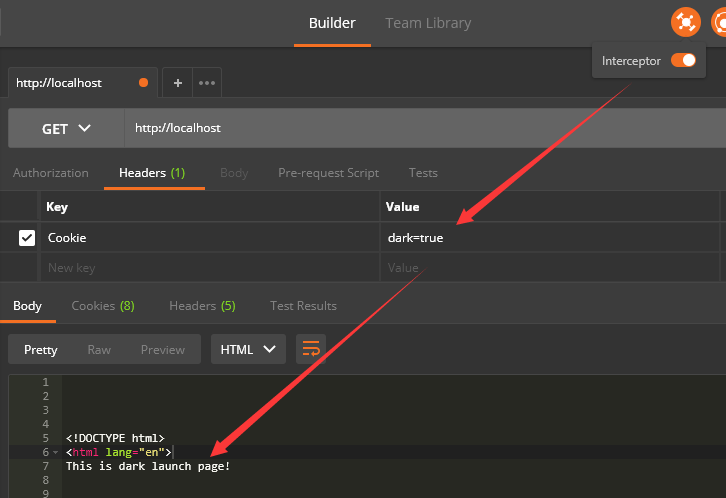
可以看到带有灰度Cookie的分流到了灰度环境。
另外为了调试方便,可以直接access.log加上$http_cookie$cookie_dark

1
2
3
4
5
log_format main 'dark=$cookie_dark - $remote_addr - $remote_user [$time_local] "$request" '
'$status $body_bytes_sent "$http_referer" '
'"$http_user_agent" "$http_x_forwarded_for"';
access_log logs/access.log main;

请求产生的日志打印如下:

1
dark=true - 127.0.0.1 - - [04/Nov/2017:14:08:46 +0800] "GET / HTTP/1.1" 200 11452 "-" "Mozilla/5.0 (Windows NT 10.0; Win64; x64) AppleWebKit/537.36 (KHTML, like Gecko) Chrome/62.0.3202.75 Safari/537.36" "-"

基于Header分流

基于Header分流的原理和用法都和Cookie类似。只有两点不同:

  1. 获取灰度标识,使用的是$http_dark(即$http_header名)的写法;
  2. Header不能像Cookie一样在客户端保留,所以一般是在多层网络中使用,即入口层给Header赋值,分流层再去分流。

这里为了演示ngx_http_map_module的用法,使用了map替代了上面的set if判断方法。

1
2
3
4
5
6
7
8
9
10
11
12
map $http_dark $group {
~*true$ dark;
default normal;
}
server {
listen 80;
server_name localhost;
location / {
proxy_pass http://$group;
}
}

基于IP分流

基于IP分流原理:校验客户端的IP是否在我们的灰度IP列表中。
所以关键有两点:

  1. 如何获取客户端IP?其实有很多方式。可以参考这两篇博客nginx 如何配置来获取用户真实IPHTTP 请求头中的 X-Forwarded-For,X-Real-IP
  2. 灰度IP列表怎么保存?其实可以保存在配置文件或数据库等任意地方。

假设我们有一张mysql的表存着配置的所有需要分发到灰度的IP地址,如果请求的IP在表中能够查到的话,则分流到灰度环境。我们这边最简单的创建了一个表,并插入一条IP地址。

1
2
CREATE TABLE `test`.`dark_launch_ips`( `ip` VARCHAR(16) NOT NULL, PRIMARY KEY (`ip`) );
INSERT INTO `test`.`dark_launch_ips` (`ip`) VALUES ('1.1.1.1');

本节使用了lua脚本来判断分流,在Nginx里面使用lua需要Nginx额外增加lua-nginx-module模块,或者直接使用打包好的OpenResty。为了演示,我们依然使用了两个location,只是不再使用upstrem,而是使用content_by_lua简单返回一个字符串,目的是能够在区分分流的前提下尽量简化其他细节,以突出核心逻辑。在Nginx中连接mysql的方法参考lua-resty-mysql模块。最终Nginx的核心配置如下:

1
2
3
4
5
6
7
8
9
10
11
12
13
14
15
16
17
18
19
20
21
22
23
24
25
26
27
28
29
30
31
32
33
34
35
36
37
38
39
40
41
42
43
location @normal {
content_by_lua 'ngx.say("normal")';
}
location @dark {
content_by_lua 'ngx.say("dark")';
}
location /test {
access_by_lua '
local mysql = require "resty.mysql"
local db, err = mysql:new()
if not db then
ngx.log(ngx.ERR, "failed to instantiate mysql: ", err)
ngx.exec("@normal")
end
local ok, err, errcode, sqlstate = db:connect {
host = "127.0.0.1",
port = 3306,
database = "test",
user = "root",
password = "root",
charset = "utf8",
max_packet_size = 1024 * 1024,
}
if not ok then
ngx.log(ngx.ERR, "failed to connect: ", err, ": ", errcode, " ", sqlstate)
ngx.exec("@normal")
end
-- 以上代码是连接数据库操作,下面代码是获取IP并去数据库查询验证
local req_ip = ngx.var.http_x_real_ip or ngx.var.http_x_forwarded_for or ngx.var.remote_addr or "0.0.0.0"
local name = ngx.unescape_uri(req_ip)
local quoted_name = ngx.quote_sql_str(name) -- 防SQL注入
local res, err, errcode, sqlstate = db:query("SELECT COUNT(*) AS cnt FROM dark_launch_ips WHERE ip = " .. quoted_name)
if not res then
ngx.log(ngx.ERR, "bad result: ", err, ": ", errcode, ": ", sqlstate, ".")
ngx.exec("@normal")
end
if tonumber(res[1]["cnt"]) > 0 then
ngx.exec("@dark")
end
ngx.exec("@normal")
';
}

注意:

  • 从Header中取出参数值可以通过ngx.var.http_x_real_ipngx.req.get_headers()["X-Real-IP"],参考ngx.var.VARIABLE
  • 利用ngx.var.http_x_real_ip or ngx.var.http_x_forwarded_for or ngx.var.remote_addr or "0.0.0.0"获取IP,仅仅是一种使用方式,具体的IP获取方式需要根据实际使用场景来决定[例如是否有多层代理]。
  • ngx.quote_sql_str(name) 可以防SQL注入,详情参考文档lua-resty-mysql,如果不转义直接拼接,攻击者可以伪造Header来跨过校验。例如采用下面代码自行拼接SQL,则使用Header值为1.1.1.0’ or ‘1’=’1即可通过校验

    1
    "SELECT COUNT(*) AS cnt FROM dark_launch_ips WHERE ip = \'" .. req_ip .. "\'";
  • db.query查询出的结果res是一个二维数组,可以通过以下当代查看其结构,本例中的结果为[{“cnt”:”1”}],具体可以参考Debugging

    1
    2
    3
    local cjson = require "cjson"
    local result = cjson.encode(res)
    ngx.log(ngx.INFO,"result: ", result)
  • 如果为了提高性能,可以采用init_by_lua将IP一次从数据库中取出放在全局变量中,在access_by_lua时使用全局变量判断即可。这样可以解决频繁访问数据库的问题,但是如果中间有修改(或增加删除)数据库中的IP,则可能不会立即生效,而且配置IP太多,容易占用很大内存。当然新引入的两个问题也有解决方案,比如修改IP后,触发一次Nginx的reload和采用更好的算法来解决内存问题。大家只需参考,实际使用还需根据自己的场景选择。

  • lua-resty-mysql模块还提供了连接池效果的功能。详情可以参考文档set_keepalive函数

其他分流

其他分流策略还有很多,如根据请求URL分流、随机分流、根据请求字段(如客户ID)的hash值分流等,一般都是与业务相关。
下面再介绍下URL分流,例如以下场景:如果url以dark结尾,则分流到灰度。本文继续使用一个新的模块ngx.balancer来做负载均衡。

1
2
3
4
5
6
7
8
9
10
11
12
13
14
15
16
17
18
19
20
21
22
upstream balancer {
server 0.0.0.1; # 这里写一个不存在的IP,作为占位填充
balancer_by_lua_block {
local balancer = require "ngx.balancer"
-- 下面一般是根据某些参数来计算要分流到哪里
local host = "127.0.0.1"
local port = 8080
local m, err = ngx.re.match(ngx.var.uri, "dark$")
if m then
port = 8081
end
local ok, err = balancer.set_current_peer(host, port)
if not ok then
ngx.log(ngx.ERR, "failed to set the current peer: ", err)
return ngx.exit(500)
end
}
keepalive 10; # connection pool
}

访问http://localhost/someurl-dark 访问的是灰度节点;访问http://localhost/someurl 访问的是生产节点。
访问验证正如预期!

分享到